Thursday 31 May 2012

Ceramic Name Board design Ceramic

Ceramic Name Boad design Ceramic
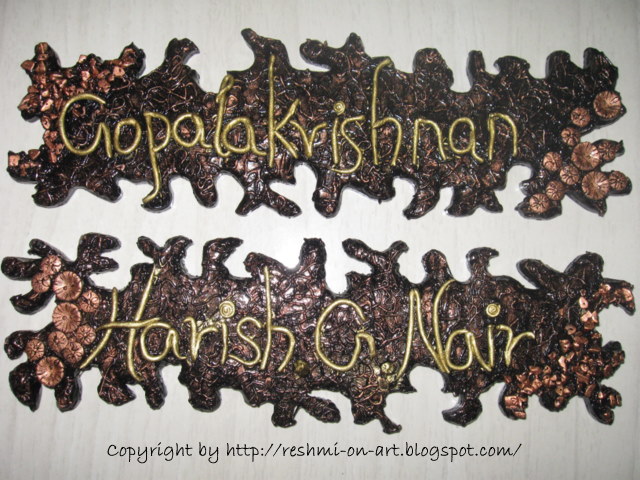
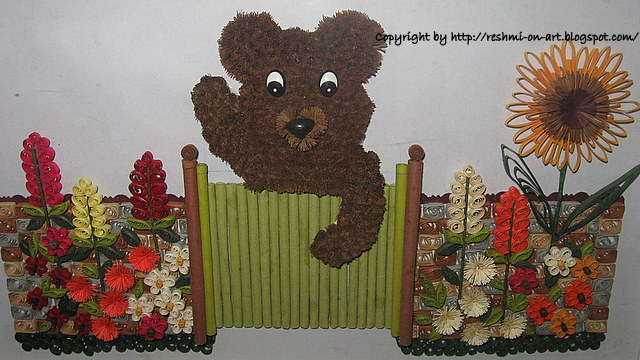
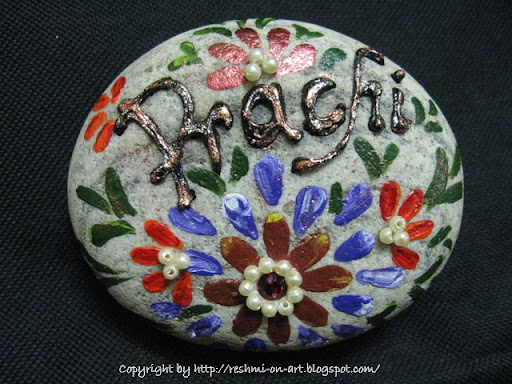
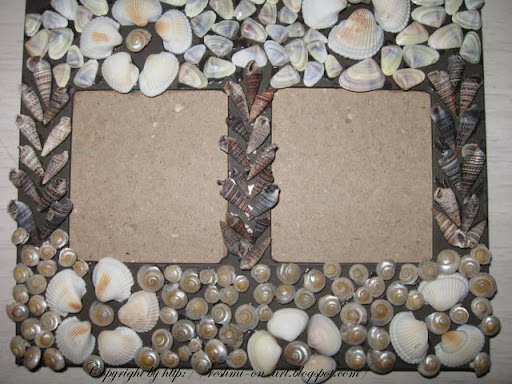
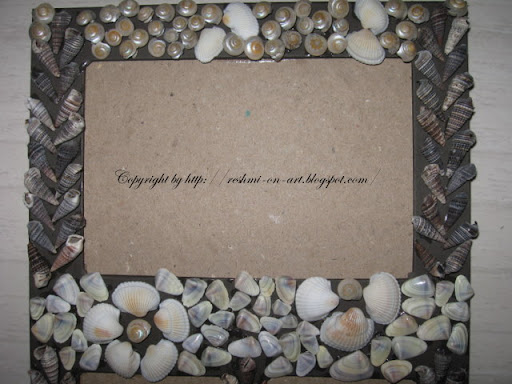
New one added to my bucket. A little Ceramic Name Board on my door.


The method and procedure goes the same way as all my ceramic projects.


 Materials used:
1. Plywood (Any shape, size, design)
2. Whitening powder
3. Fevocil
4. Acrylic Colours


How to make the Ceramic paste:
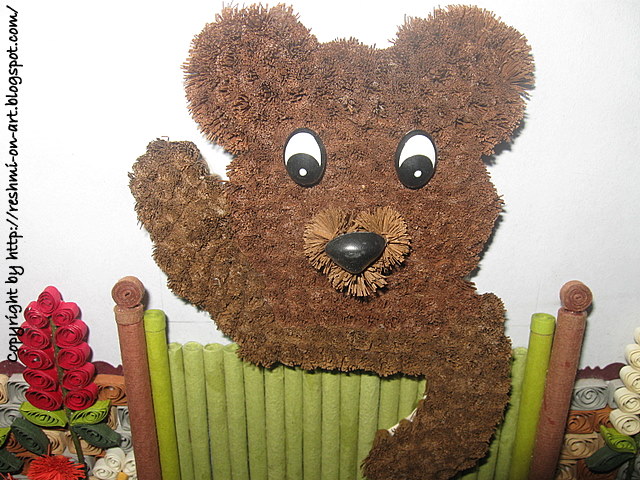
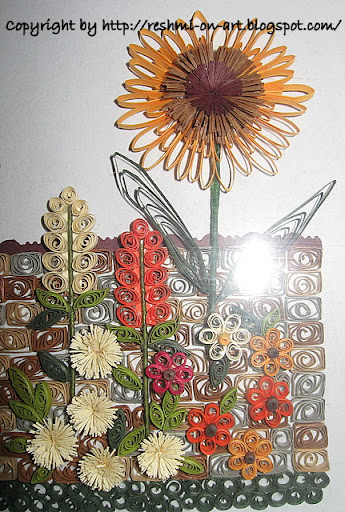
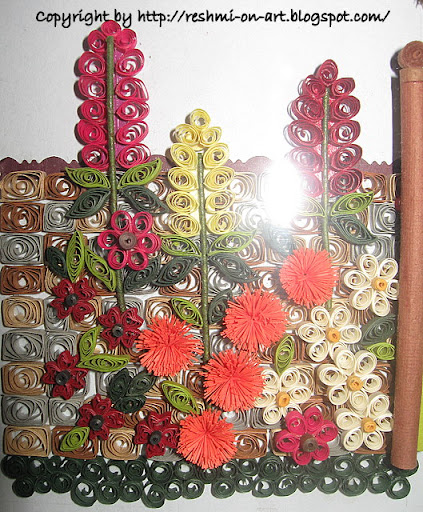
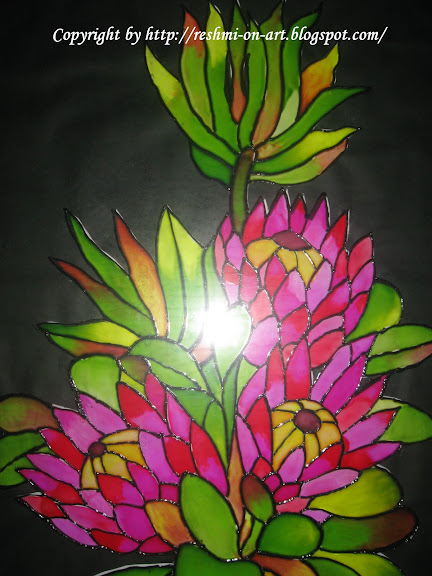
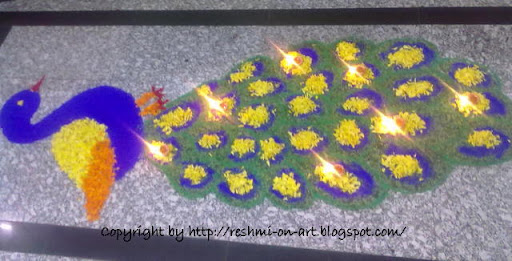
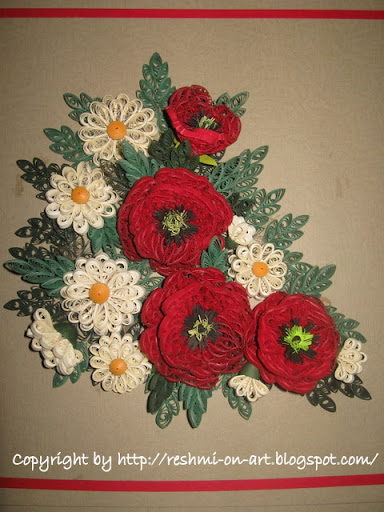
Firstly take some amount of Whitening powder and add Fevicol to it Mix it well, it should not be a dough, should have loose consistency like a Cream or lotion. Apply it directly on the plywood and allow it to dry, once done you can add your magic to it by adding colours and more designs. Here I add some of my fav pics of my Name Board. I love too see it on my door. Comments please :)


 Ceramic-Name-Board-Design


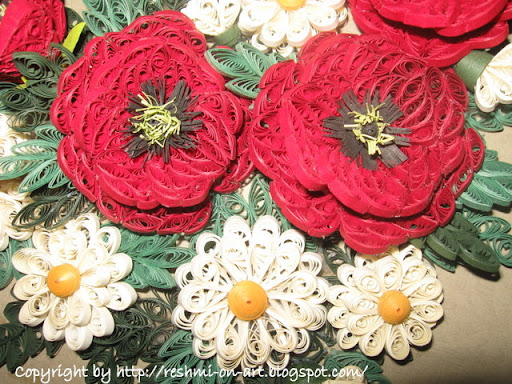
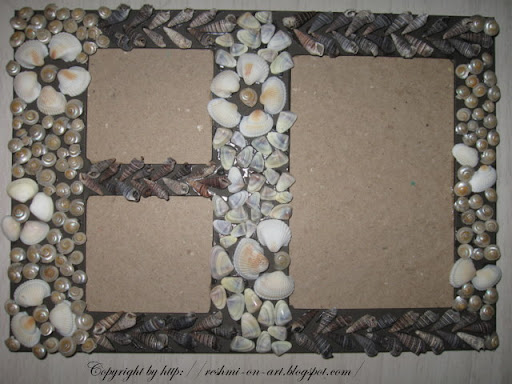
Closer view on the Button work Name-Board-Button-Work


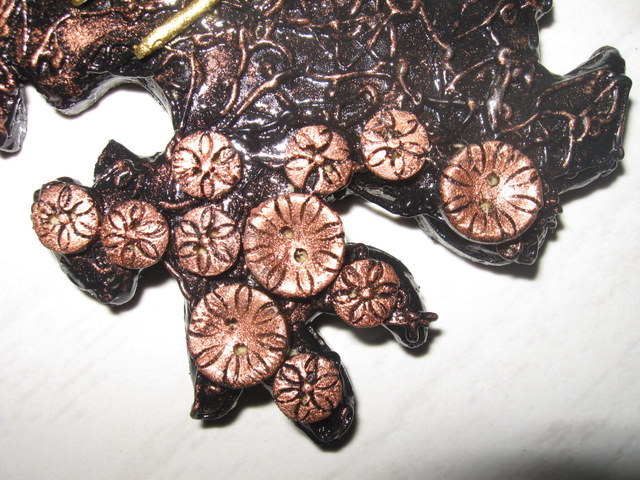
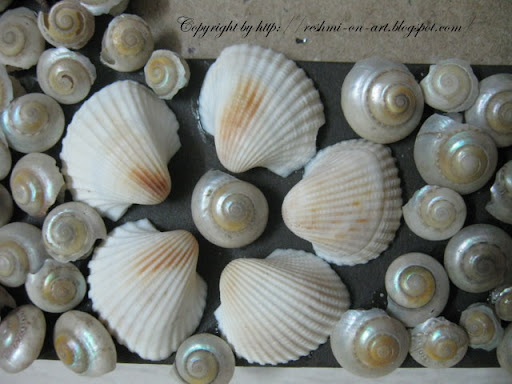
Closer view on the stone work Name-Board-Stone-work
Name-Board 
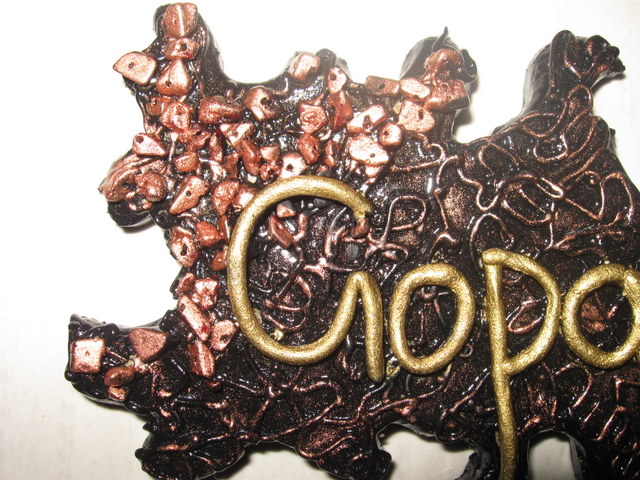
Related Posts - Ceramic work

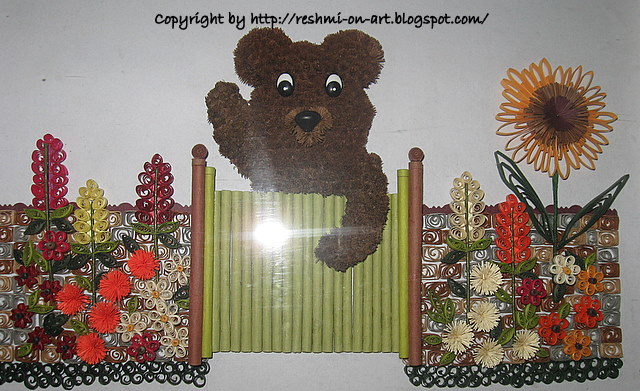
pot-painting-lovely-dove
pot-painting-Ceramic flowers on pot

Tuesday 14 February 2012

Workshop on Glass Painitng Leaf Painting on 25th Feb, 2012 at Raghuleela Mall, Vashi

Announcing workshop on Glass painting & Leaf Painting on 25th Feb, 2012 at Raghuleela Mall,Vashi (Navi Mumbai).

Interested participants could join me at the venue on 25th from 11.00 am onwards.

Grab the opportunity of learning Glass painting and Leaf painting techniques and enjoy to the fullest.

HAPPY VALENTINES DAY to all of you with lots of love.

Labels:

Saturday 10 December 2011

Announcing craft classes and Craft orders

Art and Craft Hobby classes

Friends, I'm pleased to announce you all that I would be conducting classes for drawing and craft and would also be accepting orders for painting and craft.

Anyone who would be interested to join classes or for orders please contact me on
+91 9833246787
You can even mail me to reshmionart@gmail.com

Labels:

Thursday 1 December 2011

Quilled Teddy Bear and colourful flowers

Friends...!!! As promised to you all here comes my favourite quilling craft with a cool waving Teddy and colourful garden of flowers.

This took me two months to complete. To complete the Teddy it took almost 250 fringed flowers, the wall was made of 120 quilled bricks and then goes the beautiful flowers to complete the garden. Those are just some random mixture of quilled and fringed flowers and a husking Sunflower to complete the garden.

Firstly the wall was made, then the gate for the Teddy to peep, arranged flowers in a way to make the garden look colourful and filled, then the brown fringed Waving Teddy to complete the frame.

I used 10mm strips for the teddy as we need to do fringed flowers for it, the walls and flowers were 5mm strips.

So, now you all can have a look at the completed Quilled Teddy Bear Frame.


Completed Teddy Quilled Frame

Quilled-Teddy-Bear-Frame

Teddy bear made of fringed flowers

Fringed-flower-Quilled-teddy-bear

Quilled-Sunflower

Quilled-colourful-flowers

Quilled-Teddy-bear-and-colourful-garden-flowers

Labels:

Sunday 27 November 2011

New works coming up...!!!!

Got up in the morning suddenly and thought of blogging, that definitely meant i was sleeping these months. Yes friends...!!! I'm back from the loooong vacation. Its not that i have stopped doing crafts, its just that less of time, more of laziness and loosing of my Camera made me crazy and forget my beautiful little blog and my great fans.

I'm would like to thank those who still visit my blog regularly even if there are no updates.

People are behind me for some glass painting designs and apart from that there lot of them screaming, shouting and abusing me for not sharing GLASS PAINTING DESIGNS with all. Just would like to suggest you all if you browse through internet you can get thousands of free sites providing designs. FYI to all i would be sharing some great sites where you can get some really good designs.

I have made some really good crafts these days, to begin with my favo Quilling craft, i made a Teddy bear frame, I made Wedding Tiara for my friend who will be getting married on 3rd of December, some beautiful tissue paper flowers.
On a big note i'll be going to start with Kerala Mural paintings also.


Will be sharing all my work soon, as i got a new camera now. Need all your support as earlier.

Here are some links i would like to share with you all for Glass painting

"Stained Glass Painting Designs".

"Glass Painting Designs".

"Glass Painting Floral patterns".

Will share some more that i have handy with me.

Monday 4 April 2011

Glass Pinting - Floral patterns

A busy schedule is making my blog incomplete :( I wont be disheartened will keep on posting as and when i find time. To all my readers, thanks for all your support and comments till now.

With regards to huge request on my glass painting work, I'm posting one more of my glass work. A floral patterns to go on. This was done a month back, a beautiful glass design with a black background.

Now to let you all know about the black background, its not painted. After completing the glass painting, i had a cut out of the design in white paper which was then pasted on the backside of the design, below that a black card paper was pasted which completed the picture.

So, after a long break friends do have a look at this beautiful glass painting.

Your valuable comments needed :)


Glass APinting - Floral Patterns

Closer view of glass painitng design

Glass Painting vase with flowers

Labels:

Tuesday 11 January 2011

A new life..... A new begining.....!!!!!

After long two months I'm back to my blogging world, just not blogging world a new world with a new life.

Yes, I'm getting back to my normal life after a long one month of married life. A life filled with fun, excitement & lot of responsibilities. Learning of new things each passing day makes me feel great at the same time missing my parents.

Staying far from your parents is not an easy task.. What more to say, thats life.. :)) But, lucky to have good in-laws to live a happy life.

On my wedding day with my sweet little friend. The one who stood with me in all my ups and downs, who stood with me when i needed the most. Thanx a ton SWAP for being with me, stay the way you are.. Love you a lot.


With my hubby :) A great husband with a great support for me.


Need all your blessings for my future. Will be coming soon with all my brand new crafts

More of quilling designs, murals and all time favorite glass painting designs.


Thursday 4 November 2010

Peacock Rangoli Designs for Diwali

HAPPY DIWALI TO ALL OF YOU...!!!

The festival of lights are back again and and even i'm back with a beautiful rangoli design for Diwali.

Diwali is one of the biggest festival of Hindus, celebrated with great enthusiasm and happiness in India. Colorful varieties of fireworks, Different colourful lamps are always associated with this festival. On this day, people light up diyas and candles all around their house.

This was made in my office premises for Diwali.

Do comment me on this little Rangoli.

Enjoy this Diwali with lots of light and less of noice :)

HAPPY DIWALI...!!! HAVE FUN...!!!

I'll be back with more of beautiful posts.

Comments Please :)


Peacock-rangoli-designs

Labels:

Friday 24 September 2010

Become my Facebook fan

Hello my best readers ,

I have created a facebook fan page recently and am trying to increase the fanpage this month. So I would like to request you all that if you love my art work , tutorials ,tips , please do follow me in facebook . Please visit my Reshmi On art facebook page and like my page . Or simple click the like button below and be part of my group .


With love ,
Reshmi Nair

Saturday 18 September 2010

Quilling Poppies and Daisies Flowers

Now here is a beautiful frame work of quilled poppies and daisies i was making. It took me almost 2 months to complete it, but my efforts were worth it and was happy completing this frame work.

There are almost 1000 shapes in this frame to make these flowers and leaves.
Teardrop shapes to make white daisies and marquises shapes to make poppies flower and leaves.

Each poppy flowers has almost 70-100 marquises shapes depending on the size of the flower.

To stick these assembled flowers and leaves to the hardboard i used Silicon rubber solution rather than normal fevicol.

Now here is my work, do comment how is it.


Quilled-poppies-daisies

Take a closer view of poppy and daisy flowers.

beautiful-poppy-and-daisy-flowers

closer-view-of-poppies

Daisy-buds-and-poppies

Look at these beautiful white daisies.

White-daisies

Do comment :))

Labels:

Wednesday 18 August 2010

Making 3D quilled white mouse

Helloo everybody, back to my posting again. I know it's really bad of me that i do not update my blog regularly. I'm really tied up a lot with my job.

In between there was a big day in my life, yes..!!! I got engaged last month, all these kept me busy from posting anything. Now I'm writing again with a new quilling work. I tried out a new little 3D quilled mouse.

Would like to thank Inna for her superb work, I also tried this cute little mouse looking at her work.

Inna if you read my blog, I'm a regular visitor of your blog and love all your quilling creations. You really do wonders with those paper strips.So, here you inspired me to make this mouse and my trial was amazing enough.

Now for all you readers:

All you need is some white paper strips of 3mm.

Take 2 full strips and make grape roll out of it.

Stick both grape rolls together, the busy of your mouse is ready.

Now make ears with 3/4 th strip of white paper, make a tight circle and give a leaf shape to it.

Stick those ears. Take 3 piece 1 inch black strip and make 3 tight circles for eyes and nose.

Stick all these together and form your mouse.

Take a 4 inch white strip troll it over a toothpick to get a spiral shape, then stick it as mouse tail.

Wasn't that simple to make this cute little mouse.
Click "here" to see the amazing work of Inna.

Here is my sweet little mouse.


3d-Quilled-white-mouse

Quilled-mouse

quilled-white-mouse-peeping-from-pot

Closer-view-quilled-little-mouse

Labels:

Saturday 12 June 2010

How to make figures with shells?

Something new this time :) You all might be thinking where am i diapprearing in between, i'm really tied up with my work. there are lot of things am doing currently and needs to be updated, but its not completed yet.

I am on my way to some awesome quilling projects, i hope i get enough time to complete and upload it soon.

Anyways, let us keep the quilling aside and see something new, not very new to who already know about it, but its new for me as i'm doing it for the first time.

Materials you need:

1) Shells (Any of your choice)
2) Silicone sealant / Fevicol
3) Fabric colours

How to make it:

There is not much to explain how to make these beautiful figures, you just need is to decide what you want to make and then get some shells of the desired shapes and sizes.

Use silicone sealant and start sticking shells as per your figure or anything that you wish to make.

Use fabric colurs to give glow to your shell figures. Use the colurs to make it more lively.

So enjoy making this simple shell figures. I hope evryone will try this our for sure :)

Now what i need is your valuable comments, so comments please :)

Here is my work.


Shell-work-lady-carrying-vegetables

Shell-work-cock-and-hen

shell-figures-work

Related Posts - Shell work on photo frame

Shell work on photo frame

Labels:

Sunday 4 April 2010

How to do Rock painting?

Dear Friends, How are you all.. ??

Thank you all a lot for checking my blog regularly even if you didn't find any thing new in it.. Now today I'm back with new thing which i tried it for the first time, its rock painting.

Firstly thanks to "PRACHI" for giving me a chance to do something new. She got me a small rock to write her name on it and i turned out the stone to a different thing with her name on it. So, Prachi you can use it as a paper weight also as i know HEWITT does not have papers there, everything is system operated.. "HAHAHAHA"

So jokes apart, this was a very new thing tried out by me.

Materials used:

1) Rock (Any shape / size)
2) Fabric / Poster colours
3) Beads (optional)
4) Varnish

How to start with :

1) Choose any design you want to paint and do the magic with your brush

2) If you are not good with painting you can stick some charming beads to it.

3) Here I wrote a name to it and some simple florals added with beads to make it a bit more attractive, some sparkles also added.

Hope you all will try it out and will like this too :)

So, my dear friends, comments pleaseeee :)


Name-painted-on-rock

Rock-Painting

Labels:

Sunday 14 February 2010

Making Duplex paper flowers-Valentine Roses

Happy Valentines day to all who are in love..!!!
And Happy Independence day to all who are single...!!!

Finally the day has come. Lot of gifts and flowers all over. So here i came along with some real looking Duplex paper rose flowers.

This was just like any other flower making tutorial, was much simple to make and looks so real. True lovers who do not want their flowers can make their own flowers and gift it. Funny but true fresh looking paper flowers are also worth gifting itself.

Anyways the tutorial is much simple. All u need to do is cut a heart shape paper for petals (6 cms each) and then give some curves to the two ends of the shape. Your petal is ready, now just keep on arranging it one after the other to form the flower.

In this way you can have a simple and sweet bundle of flowers. Enjoy making it.

HAPPY VALENTINES DAY TO ALL OF YOU..!!!

Comments please :)


Duplex-paper-flowers

Duplex-paper-roses

Duplex-paper-valentine-red-roses

Labels:

Sunday 24 January 2010

Stain glass Painting patterns - Birds

After a month of long break I'm back with a new post on glass painting, yes a stain glass painting.

Firstly sorry to everyone for not having regular posts now a days. This is coz of my new job and long travelling hours, due to which i cannot find time to have any new work. Still I'm on process with a new quilling project, which will be seen soon.

Here now I'm posting a cute little stained glass painting. My first trial on stained glass, it came out quite well. And one more thing I'll try my best to have one post a week for sure so that you can all enjoy new work and learn new things too.

Note: Readers who like this design can copy it to try their hands on the same work.

Now tell me how is this new stain glass painting work. Comments please :)


Stain-glass-painting-birds-design

Labels:

Friday 1 January 2010

Happy New Year...!!!

Let us all gather and pray god to fullfill our dreams with the new year. Shower his blessings with peace, happiness and rejoice all the days of our life. On new year let us all pray for well-being, peace, prosperity, love, affection and desire from God for this new year 2010.

Happy-New-Year

Wishing you all a very right and prosperous New Year.

Labels:

Saturday 26 December 2009

Recycle craft Bottle cap ceiling lamp

Friends, i was quite busy these days with new office atmosphere. Yes, i changed my job and now in this new company quite busy with training and work. Late to home so could not find time for any updates. Thought of wishing you all a "Merry Christmas" yesterday but, unfortunately my Internet connection got into some trouble and was not working.

Anyways promise you to keep on updating once in a week for sure. This time i tried out this wonderful recycle craft which i was planning to do long back. Now sharing with you all as soon as i found time and completed my work.

This is a ceiling lamp made of plastic bottle caps. I used almost 120-150 caps of Bisleri bottle to make this lamp.

All you need is a round piece of hard board nylon thread and some beads around 120- 150 as per your caps. Take the nylon thread as per the length and make holes on the caps and move cap and bead alternatively and now tie this on the hard board my making a hole on it.

So let me know how much did you all like this Recycled Ceiling Lamp made of bottle caps.


Recycle-Bottle-cap-craft

The lamp with colourful lights.

Bottle-cap-ceiling-lamp

Coloured-bottle-cap-lamp

Recycled-craft-bottle-cap-Ceiling-lamp

Labels:

Thursday 10 December 2009

How to make stocking Tulip flowers?

Sorry everyone for late updates again.

This time I'm here with stocking tulip flowers.
Firstly a big "THANKS" to the person who send me this video of making tulip flowers out of stocking material and here i tried my hands on it.

These tulips look extremely beautiful after making them as per instructions. Earlier i tried making tulips but not with the help of this video. may be coz for wrong way of making it looked like some other flower :)

So now with a proper making method I'm here to share this with you all.

Here is the video for you to make Tulip flowers.


Now tell me how is the one made by me.. :)
Comments please.


Bright-yellow-tulip-flower

More closer view of colourful tulips.

stocking-tulip-flowers

Colourful-stocking-tulip-flowers

Labels:

Tuesday 1 December 2009

Back after a long vacation...!!!!

Friends..!!!
I was on a long vacation this time. Was having fun in Kerala and Bangalore. This was after a long time i was going to my native place and was completely relaxed.
Sorry.. as i couldn't tell you all before leaving. I left to Kerala on 9th Nov and was back to Mumbai on 27th Nov.

This time i really enjoyed my vacation. All time roaming around with relatives and cousins.. Enjoyed the cool climate and was very relaxing. This time i got chance to see more places in Kerala as we did spend more time there.

I was in Blanglore for the first time and i just loved the city. Unfortunately, i couldn't spend much days there... Anyways better luck next time.

So, my vacations got over and now back to the busy schedule.

Now you will see some more new craft coming up..

Keep on reading trying out new things.

Sunday 8 November 2009

Making Shell Work Photo frame

Back with a new thing after some more gap.

Here I'm with a Shelly photo frame. Yes, I'm here with a photo frame decorated with beach shells.

I got these ready shells and a wooden photo frame. And then the photo frame was decorated with these fancy shells.

Here is the piece of work done by me.


Double-sided-picture-frame-Shell-floral-designs

This is the second side of the photo frame.

Shells-Floral-designs

A closer view on the flower design made with shells.

Shell-Flower-designs

Here is the completed work on Photo frame.

Photo-Frame-shells

Labels: